Sidenote : This is the part 10 of the ASP.Net MVC course series. You can get all the parts of this tutorial here.
In the last chapter, we have tried to get the list of movies from the non-existent database. Entity framework created the database for us and queried for movies list. As we didn’t any data, we could not display the movie list to the users.
Below are the things that we are going to do to add movie information to the database
- Create a ‘Add’ action method
- Create empty view model and pass it to the view
- In the view, show the form where user can enter the movie title and year of release
Let’s write some code.
What is [HttpGet] that we have used in the above code?
It is the method that tells what type of HTTP request it is. GET and POST are the two most commonly used methods. Let us see what each one is for.
GET and POST methods:
As we have discussed in the first chapter, all web applications use HTTP protocol irrespective of the technology used. And we talked about the statelessness nature and request/response pattern of HTTP.
HTTP has few methods to perform various operations. Out of these, two methods GET and POST are commonly used in web application development.
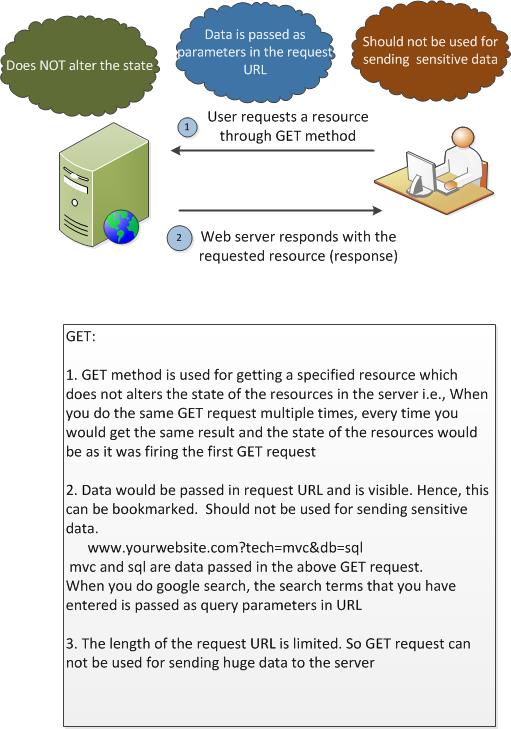
GET:
GET is the HTTP method which is used for getting the resource from the server. The data is passed as parameters in the request URL and is visible. So, it should not be used for sending sensitive data.
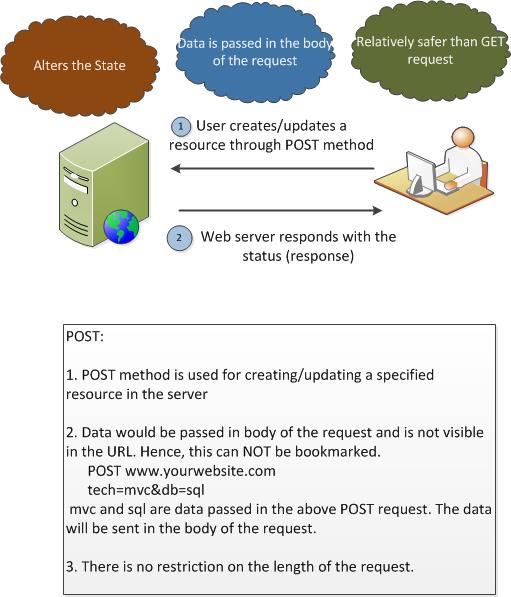
POST:
POST request is generally used to create/update the resource in the server. The data would be passed in the body of the request and hence will not be visible to the user.
Coming back to our action method code, we are creating an instance of Movie model class and pass it to the View.
When user enters the movie information in the form (provided by the view), we can get the entered values through this Movie model instance when the form is submitted. That’s the idea.

Above picture is the simplified version – where we have mentioned user enters the movie information in the view. Though it’s true, what really happens is that View would be sent to controller which in turn to be sent to the user’s browser. User would be entering the movie information is her browser.
View:
In the view, we have to create couple of text input HTML elements to get the input from the user and a submit button to submit the data to the server.
Below HTML snippet would create HTML input element for us
Instead of writing the HTML elements by hand, we can use ‘HTML Helpers’ to generate the HTML elements for us.
Below HTML helper would generate the above HTML code.
You might think there is not much difference between plain old HTML code and ‘HTML helpers’ apart from bit less code. But there are few advantages of using HTML helpers.
- Model Binding – In the above HTML helper, we were using a lambda expression(m => m.Title) – which says for what this element is used for. It generates the id and name attributes from the model information.
- Compile type safety – When you use incorrect property in the model, it will tell you that it is not available. See the red underline signifying error when invalid property(Title2) is used with HTML helper.

- Flexible – In the above HTML helper, we are passing html attributes to HTML helpers so that it will make use of them. As class is a reserved keyword in C#, we are using @class to pass the css class for the HTML element. Prepending with @ makes it a valid C# identifier. (You’ve just learned a C# tip when learning HTML Helper – that’s another advantage 🙂 )
- Lesser & cleaner code – Usually HTML helpers will have lesser code than equivalent html snippets. If you can do something with lesser and cleaner code, prefer them over intelligent convoluted code. Trust me.( I have worked on legacy code improvisation which used lot of gotos)
Below is the complete code for the Add view. You can see that I have used few HTML Helpers such as @Html.LabelFor, @HTML.LabelFor and Html.BeginForm. All HTML helpers should begin with @ – to be inferred as razor code.
We have used ‘using’ keyword and code block with curly braces to have all the generated HTML code snippets with the form tag
We have used the below code as the first line in the view.
We are telling the ‘View’ that the Model of type Movie would be passed. Then, we can use that movie model in our HTML Helpers – as we have used.
When we run the application and access the URL http://localhost:1230/Movie/Add (your port number may vary), you can see screen like below.
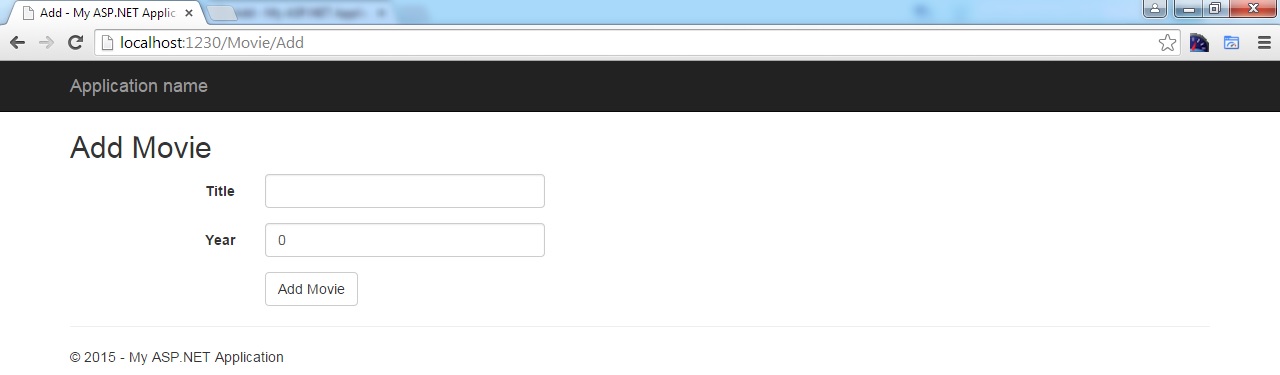
We are getting 0 in Year input element. Why?
Year property in model is set as ‘int’ type. While ‘HTML Helper’ is generating the HTML code snippets. It sets the default value in order to help us. We’ll discuss how we can change it later.
We still have our application name as ‘Application Name’ in Navigation bar. Oops.
Let us change it now.
Open Views/Shared/_Layout.cshtml file and I could see the following line which is responsible for generating the navigator bar.
@Html.ActionLink is the HTML helper which the links. The first parameter is the string to be displayed, second parameter tells the action method and third one is for controller name.
So, we have to fix 2 things here.
- Displayed text : Instead of ‘Application Name’, I would use ‘MicroIMDBv2’
- Controller Name : We don’t have any Home controller in our application. Even in routing, we have default Home controller to Movie controller. Let’s change here as well.
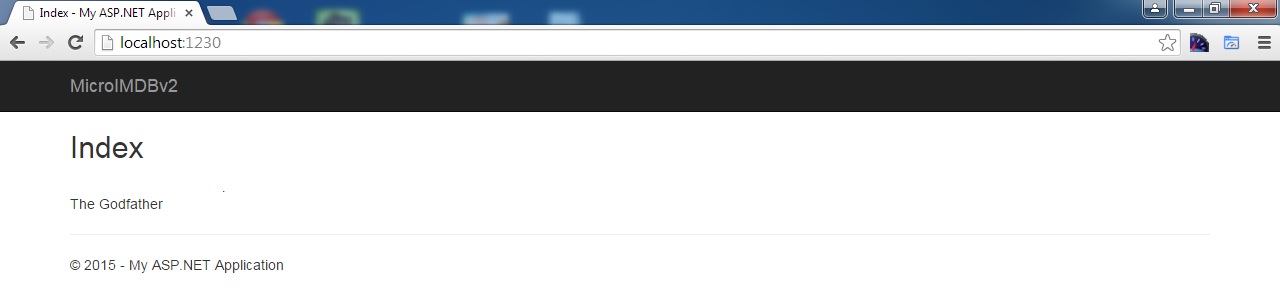
After making the above changes, the navigation bar would like below – with first and third parameters changed.
Now, run the application. You can see screen like below
It looks good now.
Saving the data:
Applications would be useless, if you couldn’t save the data. Isn’t it?
Let’s save the movie information back to the database.
In the above Add action POST method, we are saving the model values that we get from submitted form.
There are few things to be noted here.
- We are not getting each element value (Title, form) from the submitted form. We are getting all the form values in a nicely bundled package of Model.
- With respect to saving the data in the database, we are not writing any INSERT query. We just call Add method with the object(which contains the values) – this adds the object to the DbContext in memory and mark it with a flag as Added. When we call SaveChanges, all the unsaved changes(including Added objects as in our cases) would be saved to the database. Entity Framework in turn would generate the INSERT query with the values and is executed against the database.
- We are calling RedirectToAction method after saving the changes. We want to show the list of movies. As Index action method performs the same functionality, we are just redirecting to the Index action. This Index method queries the database for the list of movies and show it to the user.
Voila! We have saved a great movie in the database and got the information back.
We have not changed anything in the existing Index View – it just loops through the movies list and prints the titles. Below Index View code is for your reference.
What if the user does not type the correct data in the ‘Add’ form.
For example, if the user types only the title and forget about the year like in the below screen. And he clicks ‘Add Movie’ button.

What would happen?
Nothing special happens. It silently saves movie with 0 as year information.
But that should not be the case. You should always validate the entered data from the user.
User may be in a hurry or some malicious user want to save inaccurate information to make the database dirty.
It’s the responsibility of the developer to validate the entered data and report back to user if the data is not correct.
That’s what we are going in to next chapter.
Stay tuned in.
[button type=”flat” shape=”square” size=”large” href=”https://www.dotnetodyssey.com/asp-net-mvc-5-free-course/data-modeling/” title=”Previous chapter”]Previous Chapter[/button] [button type=”flat” shape=”square” size=”large” href=”https://www.dotnetodyssey.com/asp-net-mvc-5-free-course/” title=”Home”]Home[/button] [button type=”flat” shape=”square” size=”large” href=”https://www.dotnetodyssey.com/asp-net-mvc-5-free-course/validation/” title=”Next Chapter”]Next Chapter[/button]