Sidenote : This is the part 3 of the ASP.Net MVC course series. You can get all the parts of this tutorial here.
Till last chapter, we saw the fundamentals of ASP.Net MVC application and even we have built Hello World Application in ASP.Net MVC.
It’s time to get started with our application – Micro IMDB – in which we try to replicate the popular movie website IMDB.
We‘ll have the following functionalities in our application
- Getting list of movies
- Search the movies by name,actor
Without further ado, let’s get into action.
Fire up Visual Studio. Select empty ASP.Net MVC template and create the project (as explained in last chapter).
Our first task is to show the list of movies to the users.
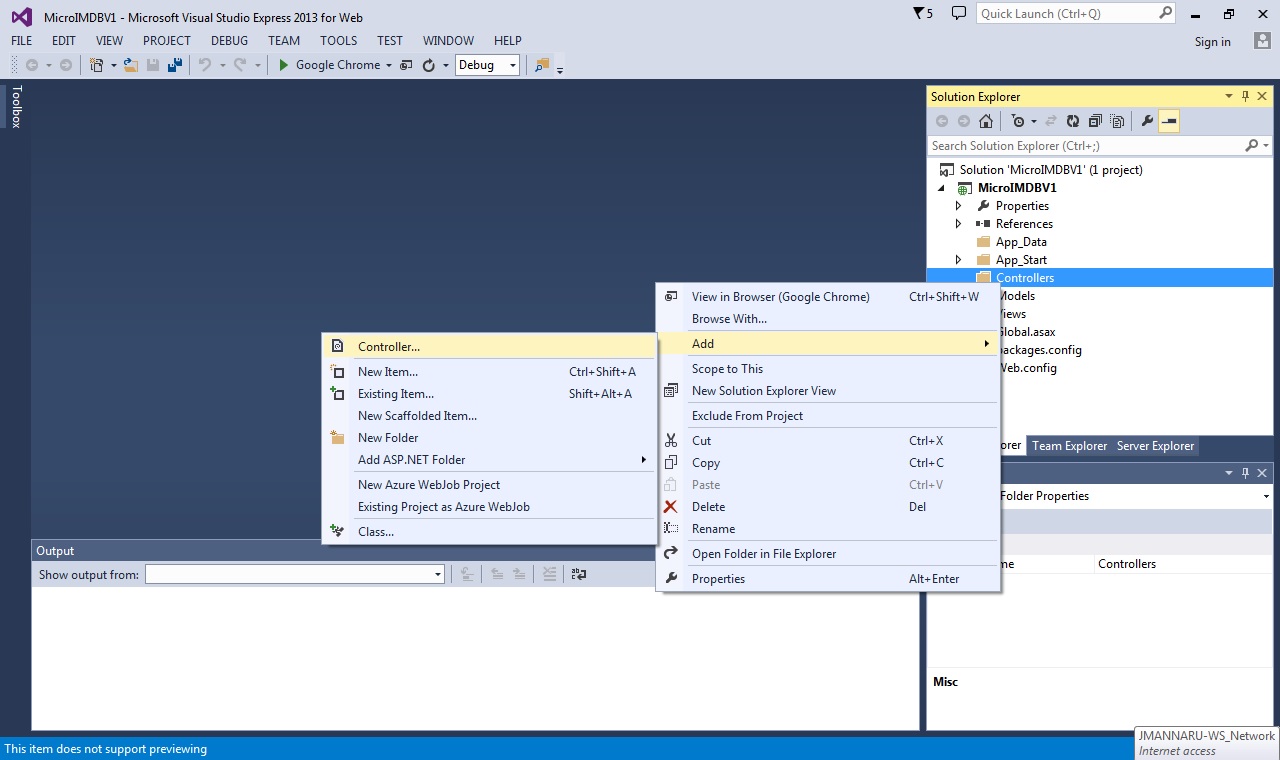
Right Click Controllers Folders -> Add -> Controller
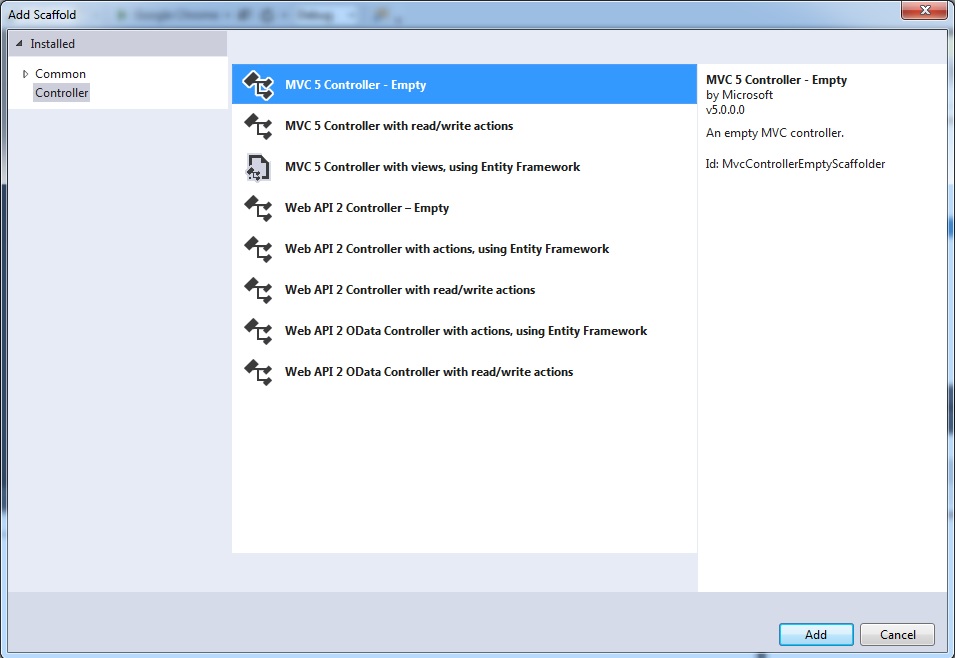
Select MVC 5 Controller – Empty and Click Add.
Give the name to your controller : MovieController and Click Add
You should not remove the ‘Controller’ in the name as ASP.Net MVC look for classes whose name ends with Controller.
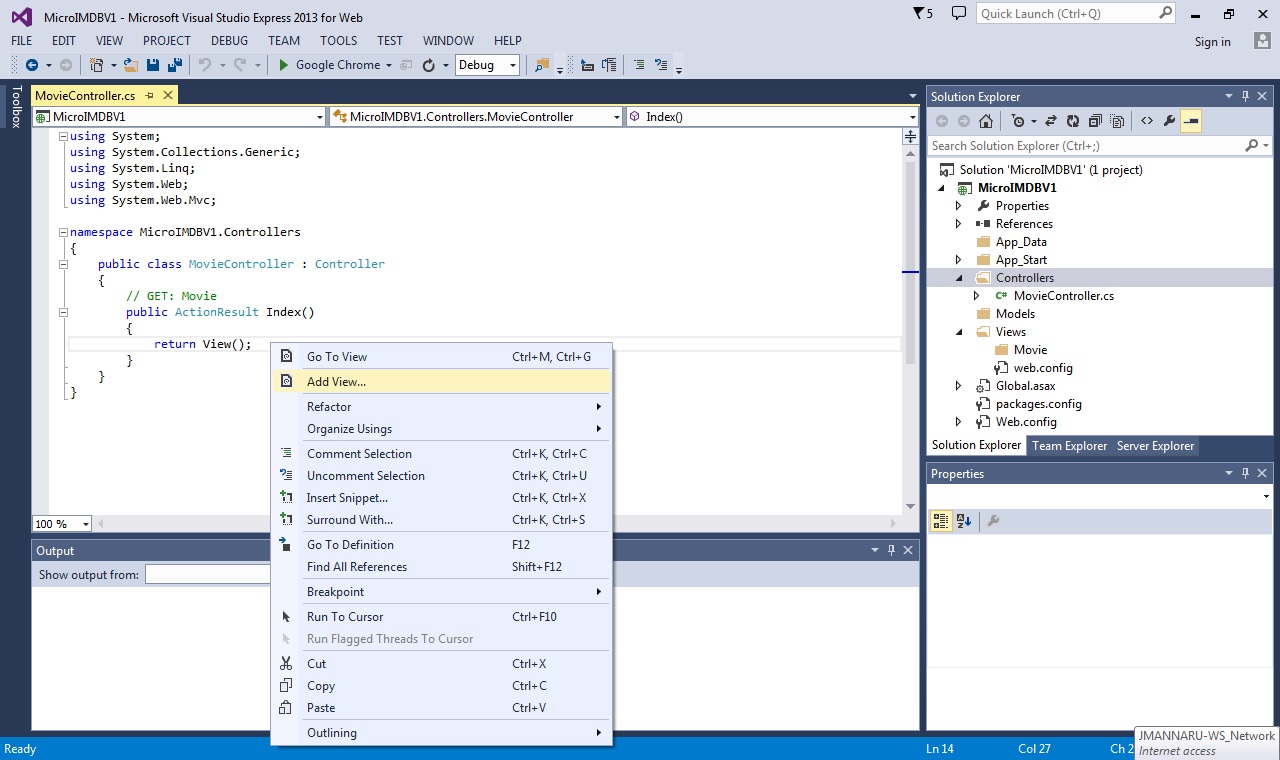
It will generate MovieController.cs with the following content
There are few things to be noted in the above code
- All Controllers should derive from Controller base class. Our MovieController also derived from System.Web.MVC.Controller class.
- The name of the controller should end with ‘Controller’ as ASP.Net MVC selects the Controller based on this naming convention
- Index action method is generated for us which returns ActionResult (which is the default return type for controller action method). It can be used to returning HTML. As discussed earlier, action method could return anything from HTML file to JSON.Here we are returning View (HTML) to the user.
In Hello world application of last chapter, we were just returning the string. Now, we are going to return the View(HTML content).
First, we create that View.
Right click inside action method and select ‘Add View’ option
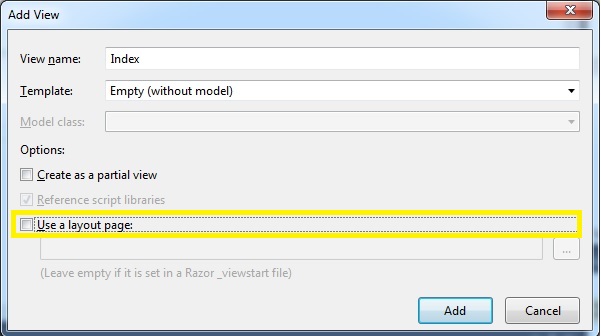
You’ll get the below template options for creating View
Name: The name of view is given as ‘Index’. I am not going to change it as we are going to show the list of movies in this view and name ‘Index’ suits better.
It will create View file with the same name. Ex: Index.cshtml
Cshtml is the extension of View file and if you are using VB.Net, you may get .vbhtml extension
Template: We have not yet discussed on Model layer of ASP.Net MVC. So, we’ll leave the default option ‘Empty(without Model)’ and move on. Later, we can change it, if needed.
Uncheck the ‘Use a layout page’ option and click Add.
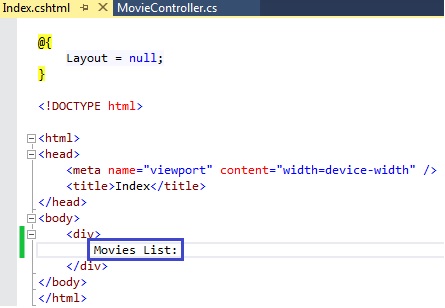
It will create html template with basic structure as follows
I have just added words to the default html generated ‘Movies List:’ – highlighted in blue box
Run the application and access the URL http://localhost:1193/Movie/Index
Now, if you run the application(or try to access the URL http://localhost/) it will look for MovieController by default.
Instead of just showing the words “Movies List”, we can show list of movies
I am changing the HTML inside the div as below
We have just showed the list of movie title along with year and rank here.
What if we have this information in list object(or from database) and if we want to loop through that list?
Razor answers that question. Let us see what Razor is and what it can do for us
Razor:
In most of the web applications, we fetch the data from the database and show it to the users. Even in our MicroIMDB application, we have to get the movie list from database and show it some table form to the users. To do so, we need to loop through the movie list and form a table (or any form that you want) to show it to the users. You can use Razor to write this looping logic in your view.
Razor is the view engine which lets you to program (in C# or VB.Net) in the views. Razor syntax is so intuitive that you can mix HTML markup with Razor code and it can easily differentiate between them and display correct information based on the context.
Please note that you can use Razor for writing only the display logic. Any business logic should be in Model layer and the data would be passed to the view through the controller.
Let us see some examples to understand it better.
Our main objective of this section is to learn razor and do come coding. So, I suggest you to create separate solution for trying these razor snippets as you don’t want to litter our MicroIMDB application.
You can follow the below steps to create project to try your razor snippets.
- File-> New Project
- Select ASP.Net Web Application
- Select Empty and select the MVC checkbox and click OK
- Right click Controllers folder and create HomeController and add Index method
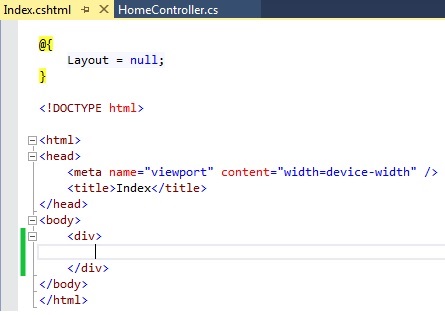
- Right click inside Index action method and select “Add View” – which creates Index.cshtml in your Views\Home folder
Above is the index view generated for us. We are going to write razor snippets within div element.
@ is the magical character of Razor – which tells the view that the text following @ is to be considered as razor code.
Consider the following code block where we have declared double variable with value 3.14. Razor knows that this is a variable declaration and should not be displayed.
Now, razor knows the following text has to be displayed to user with the evaluated value of pi.
When you run the application, you may see the following output.
If –else statement:
Consider the following code where we are generating random number between 1 and 100. You can use any class in Razor code just like we have used Random class to generate the random number.
We are checking whether the generated number is odd or even and display the information to the user. If else statement is just like C# , we just have to prepend @ so that view knows the following statement is razor code.
Razor is so intuitive – when razor sees ‘<b>’ tag (we don’t have to tell it), it knows it’s HTML tag and it displays the text in bold with value displayed.
When I ran the application, the random number generated was 76 and the following text was displayed.
The generated random number 76 is even number
Displaying plain text:
In the above razor code snippet, we have used <b> tag which tells the razor view engine to fallback to HTML mode rather than code mode.
What if we want to display it as plain text without making bold?
You might be tempted to just remove <b> tag.
If you do like that, it will throw error. You might wonder why it’s throwing error when everything seems to be correct.
The answer is we didn’t tell necessary information to Razor so that it can interpret it correctly.
When Razor comes inside if code block, it expects razor code(C# like code) and it infers “The generated…” as razor code but it’s not. So when it tries, error is being thrown.
We have to tell the razor that its simple text and it has to be displayed as simple text. We can use <text> tag to tell Razor that it’s simple text.
The reason why we were not getting error earlier while using <b> tag is that when Razor encounters <b> tag, it knows it is HTML tag clearly and it handles it appropriately. But when it encounters “The generated..” , it takes as razor code as it’s not valid HTML tag. So, we need to tip razor about the textual information when we are not using HTML tags inside razor code
Foreach statement:
In the following razor code block, we have declared integer array and initialized with prime numbers.
We can use foreach statement just like in C#. Just prepend with @ to make it as Razor. The other HTML tags are to make unordered list.
Below is the view generated for the above razor code snippet.What if we want to display @ character, say to display twitter handle like @dotnetodyssey?
@ character would tell view engine the following text is to be interpreted as razor code. And @ symbol also acts razor escape character.
So, to display @ symbol, you need to use @@.
Ex: If you use ‘My twitter handler is @@dotnetodyssey’ will be displayed as ‘My twitter handler is @dotnetodyssey’
You don’t need to remember anything to write razor code. If you want to write razor code, just use @ and start writing razor code.
Back to our MicroIMDB application:
Equipped with razor knowledge, let us rewrite the code using razor. Previously, we have hardcoded all the movie names with rank and year of release. Now, we are going to fetch that information from list and display it using razor.
See our code has become dynamic now. If we want to add movie, we don’t have to create HTML tags – we just have to add that movie object to the list. Rest will be taken care by razor –as it loops through the movie list.Important note: Just to demonstrate the razor foreach loop, we have added the movies list in View itself. You should not do like this in your application. Each layer has its own responsibility and it should do just that. View layer is meant to display information and should not contain any data on its own. All the data/business logic should reside at Model layer.
[button type=”flat” shape=”square” size=”large” href=”https://www.dotnetodyssey.com/asp-net-mvc-5-free-course/your-first-asp-net-mvc-application/” title=”Previous chapter”]Previous Chapter[/button][button type=”flat” shape=”square” size=”large” href=”https://www.dotnetodyssey.com/asp-net-mvc-5-free-course/” title=”Home”]Home[/button][button type=”flat” shape=”square” size=”large” href=”https://www.dotnetodyssey.com/asp-net-mvc-5-free-course/layout/” title=”Next Chapter”]Next Chapter[/button]
