Sidenote : This is the part 2 of the ASP.Net MVC course series. You can get all the parts of this tutorial here.
We have discussed enough theory. Now, it’s time to get our hands dirty by creating our first ASP.Net MVC application.
As mentioned earlier, we are going to create Mini Internet movie database application(like IMDB).
Fire up visual studio 2013 Express for the Web
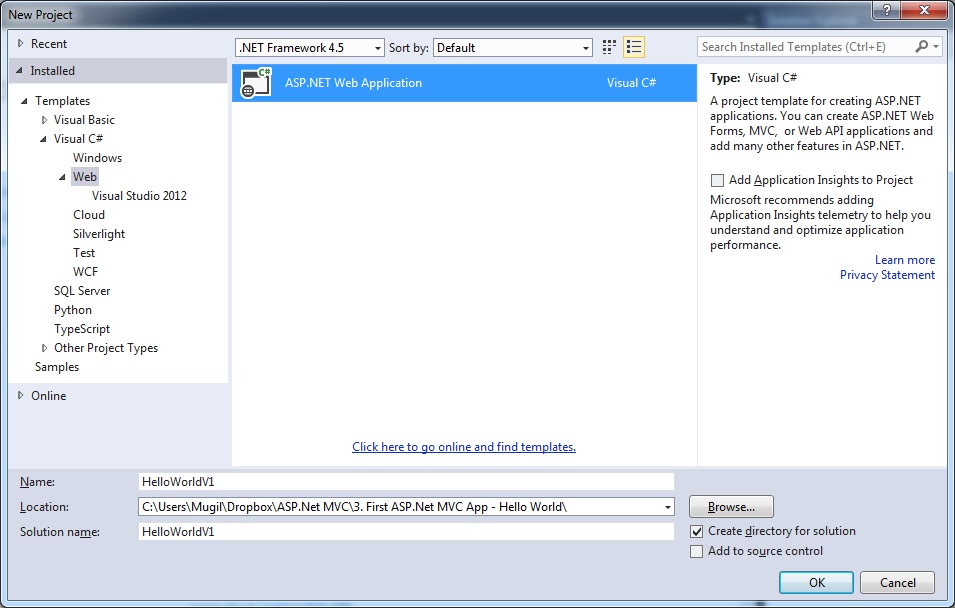
Select File -> New Project and select “ASP.Net Web Application” as done in below screenshot
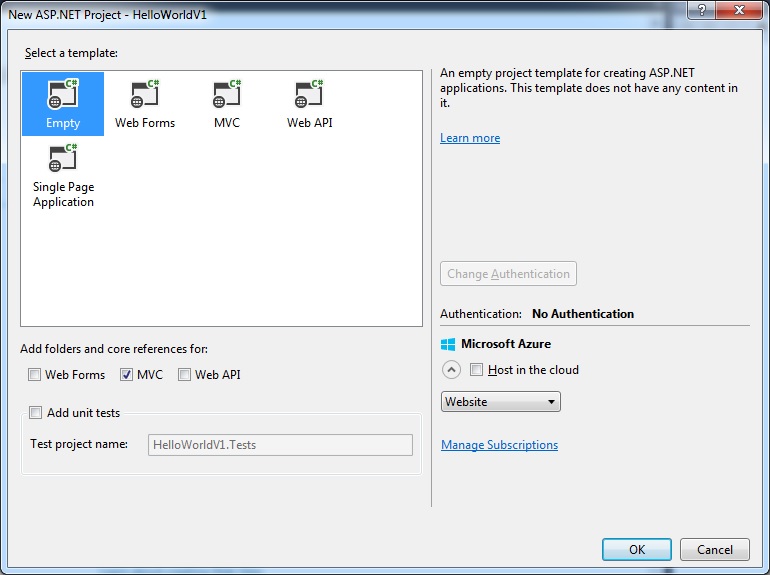
Select Empty template in the “New ASP.Net Project” window. Selecting this option will not generate any code for us. At the learning phase, it’s better to manually code many of the things so that you can know how each of these components work.
As they say, a good mechanic knows how each of the parts in the car works. I want you to be great ASP.Net MVC mechanic 🙂
Select MVC checkbox in “Add folders and core references for:” as this would create necessary folders for us.
Click OK.
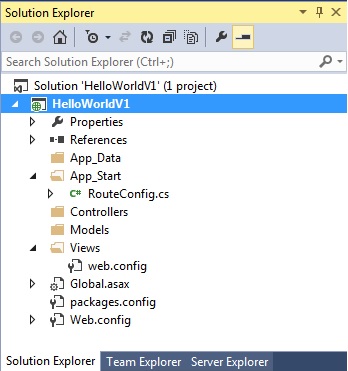
You will get folder structure like below. We have no code generated for us except the config files. So if you try to run the application now, you’ll get “resource not found” error. We’ll see why we are getting this error later.
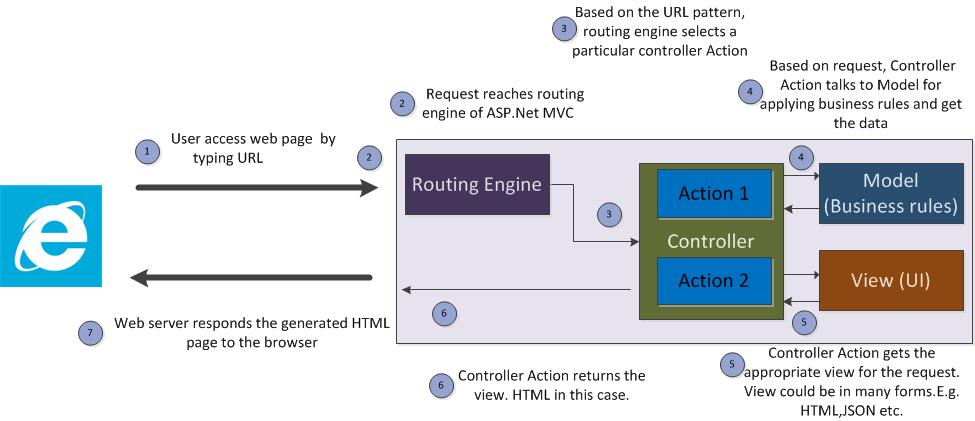
Below is the request flow in ASP.Net MVC application that we have discussed in our last chapter.
There is a small change in the flow. I’ve added Action blocks in Controller. Controller, by itself, will not do anything – like talking to model or getting the view. It has actions to do the same.
Technically action is the method in the controller class which performs a specific functionality. For example, ‘Add’ could be an action in Account Controller which adds a user account and ‘Search’ could be another action in the same controller which searches the user. We would discuss more about actions in Controller chapter.
We are going to discuss how each of these block/step works with our newly created ASP.Net MVC application. Each of these components would be discussed in brief and will be explained in detail in later chapters.
- User access web page by typing URL:
We would type URL http://localhost/ as this would access our newly created application. You have to type this URL after running the application (by pressing F5) as there is no server/service to handle your requests if you don’t run the application.
- Request reaches routing engine of ASP.Net MVC:
Web server would forward the request to ASP.Net MVC* which in turn would forward it to its routing engine. We do not have to do anything in this step as the request reaches the routing engine by default.
RouteConfig class in App_Start folder acts as Routing engine in ASP.Net MVC application.
*Notes: There are lot of things happening at this step such as receiving the request at web server, forwarding the request to ASP.Net and creating HTTP stack with involves HTTP handlers and modules. I am trying to explain at high level to make you to understand the flow. I’ll explain you additional information whenever required.
- Routing engine selects appropriate controller:
The primary purpose of routing engine is to select the appropriate controller for the request and forward that request to that controller. It selects the appropriate controller based on the URL pattern.
RouteConfig class is generated automatically(see below code) when we select Empty MVC template while creating project. RegisterRoutes is the only method(static) defined in this class.
You can also tell the routing engine, which controller to select by registering your custom route by calling MapRoute method – which we can see it in Routing chapter.
This method has just 2 statements.
First statement is saying ASP.Net MVC to ignore the route with axd extension.
In the second statement, a route is defined. It has 3 properties.
name : string value – name of the route. You can give any valid name. You can use this name to refer this route.
url : string value – If the URL pattern matches the value given here, routing engine will select this route. {controller}/{action}/{id} is the pattern given here – meaning that first part of the URL(after the domain name) will be taken as controller name and second part of the URL will be assumed as action name and third part will be acting as id parameter value.
Example : If the user types the URL http://localhost/Account/View/1 , the value of controller would be Account and View would be action name and 1 is the value passed to id
Defaults : object – the properties in this object would tell us what would be the default values – if the user doesn’t give any of the values in the URL pattern defined.
If the controller name is not given in the URL, it would assume ‘Home’ is the controller name. If the action is not given, ‘Index’ will be used as action name and id is optional – meaning that it’s not necessary to supply this information.
Let us see some examples
Example 1 : URL : http://localhost/
No controller,action or id information is given
So, this route is equivalent to typing http://localhost/Home/Index/
Example 2: URL : http://localhost/Account/
Controller information is given. No action/id information is given.
Index would be used as default action name. So it’s equivalent to typing http://localhost/Account/Index
As no controller code is written, we are getting the ‘resource not found’ error. Let us write a Home controller to fix this issue.
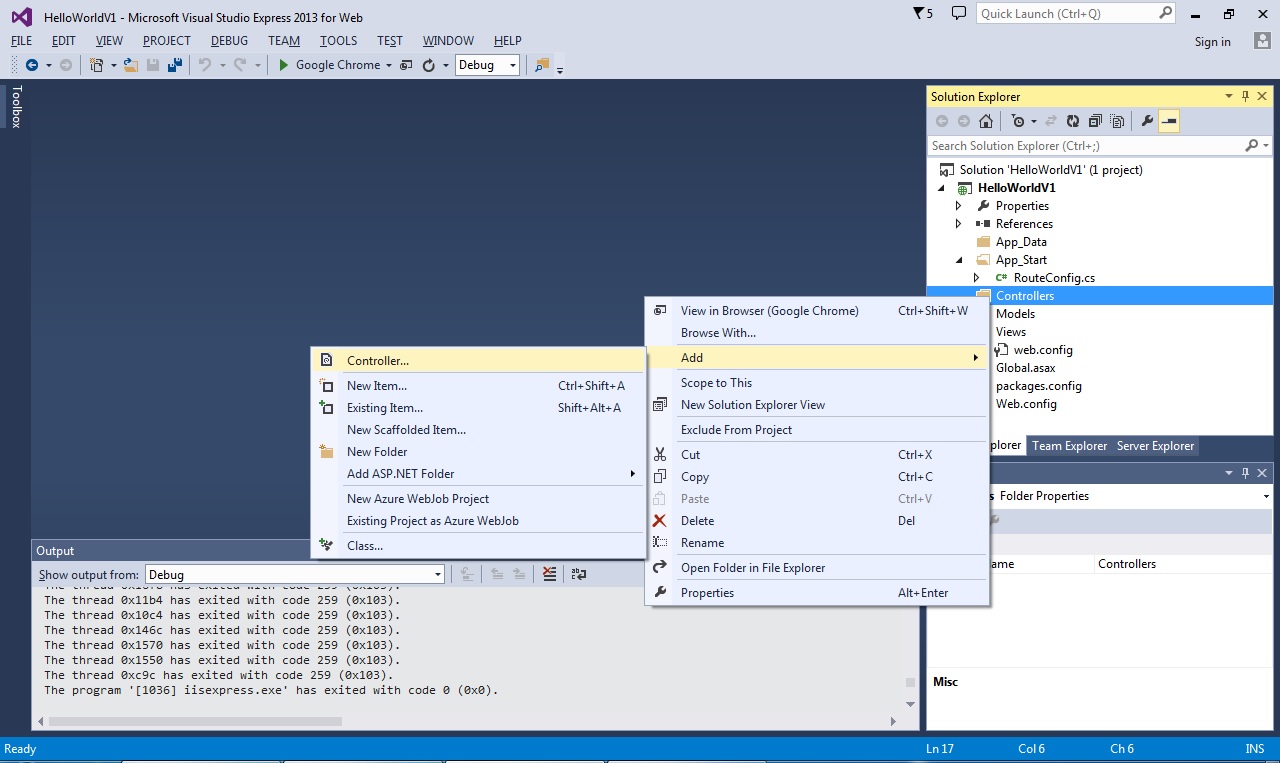
Right click on Controller folder, select Add-> Controller
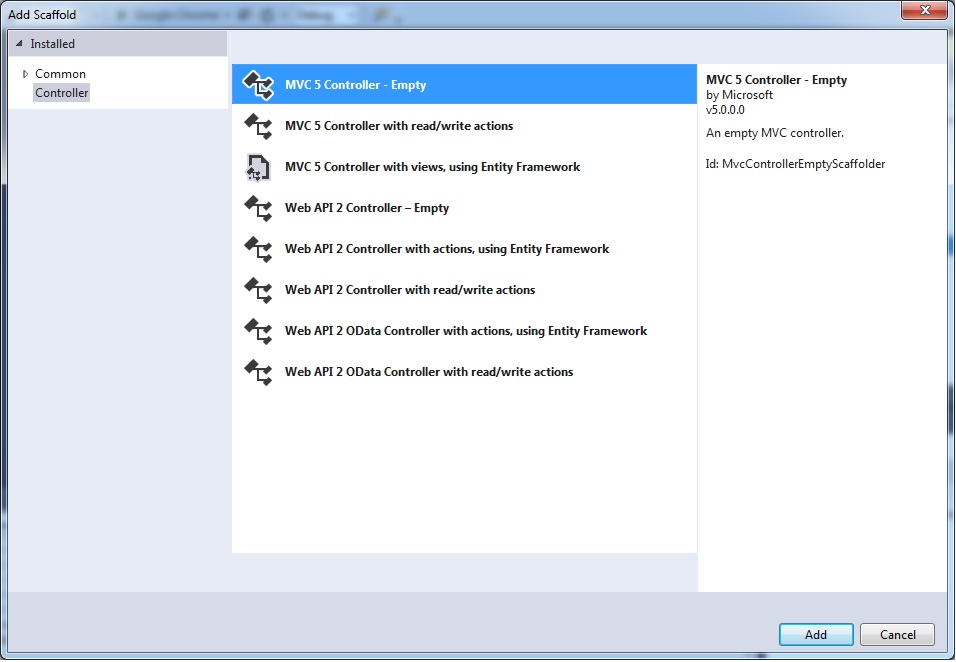
Select the MVC5 Controller – Empty, as we want to hand code
Give your controller a name – I have given as HomeController and click Add
Then, Visual studio will generate a class like below.
Above Index action is written for us by scaffolding template. I am going to make couple of changes here.
Instead of returning ActionResult(what the hell is this? – We’ll discuss about it later) , I am going to return string.
I am going to return string value “Hello World.. Excited to see my first controller in action :-)”
And the code will be like below.
And run the application and you‘ll get the following result.
What has happened?
When you run the application, you’ll have URL like http://localhost:1561/ (port number would vary for you)
The request with URL reaches the routing engine of ASP.Net MVC. As we have not supplied the Controller and Action name, it access the default controller name ‘Home’ and default Action name ‘Index’ (as defined in RouteConfig.cs)
The request is then forwarded to Home Controller and calls the Index method
In Index method, we are returning the string – which is sent to the browser and you have got the string text displayed in the browser.
There are few things to be noted
- We have not used View
- We have not used Model (Business Domain classes)
We are going to discuss about View in next chapter.
[button type=”flat” shape=”square” size=”large” href=”https://www.dotnetodyssey.com/asp-net-mvc-5-free-course/how-web-works-asp-net-mvc-fits-web-application-development/” title=”Previous chapter”]Previous Chapter[/button] [button type=”flat” shape=”square” size=”large” href=”https://www.dotnetodyssey.com/asp-net-mvc-5-free-course/” title=”Home”]Home[/button] [button type=”flat” shape=”square” size=”large” href=”https://www.dotnetodyssey.com/asp-net-mvc-5-free-course/views-in-asp-net-mvc-application-and-razor/” title=”Next Chapter”]Next Chapter[/button]
